Laravel: Understanding the Auth Guard
Stop cluttering your app with auth logic, just use the Auth Middleware.

The Auth Guards are a vastly unexplored part of most Laravel applications, since the ones that come by default already do a great job to log in users. Out of the box, you can authenticate users by:
- using a combination of Sessions and Cookies, which is the old and most reliable way,
- using a Token for a user to identify it, very goods to serve an API along with a web interface where the user can reroll the API Token,
- and using the Request parameters to authenticate only for that Request.
So practically Laravel comes with most used authentication mechanisms covered. But what if what you have in mind isn’t? What if, for example, you want to authenticate users based on a Passwordless mechanism, an IP, or checking against an API?
Instead of meddling with middlewares, which will make just spaguetti code difficult to maintain and standing where it shouldn’t be, we will create a new and simple Authentication Guard by just understanding how it works.
How an Auth Guard works
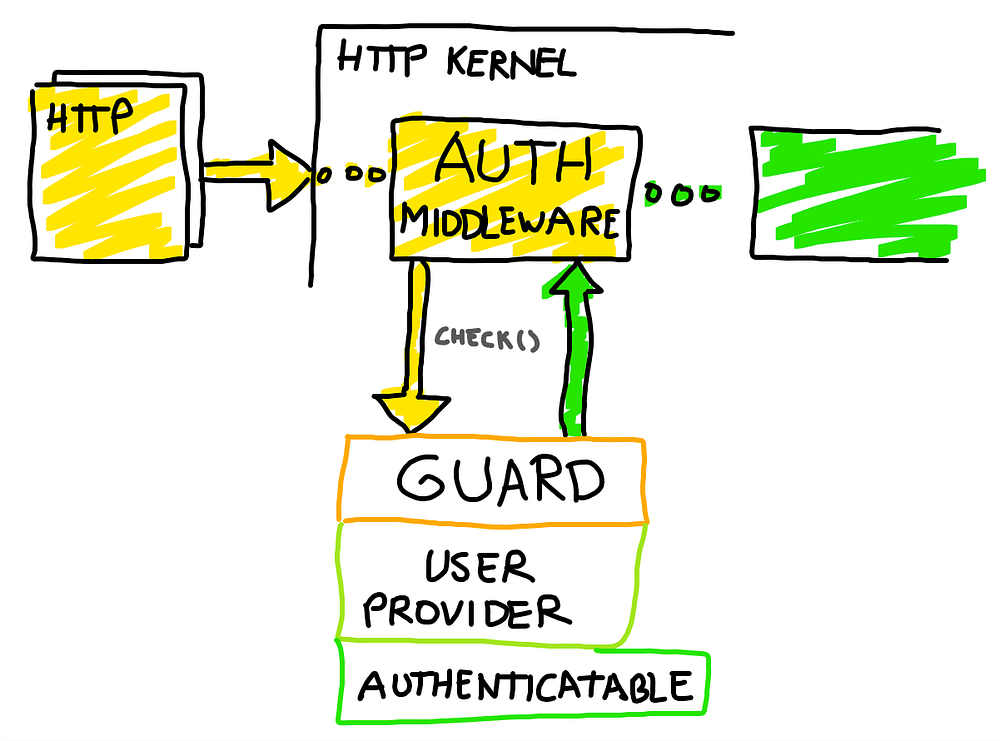
The Authorization Guard is comprised of the Authenticate Middleware and three moving parts:
- The Guard itself, which manages the authentication procedures, “where” the credentials are in the Request.
- The User Provider, that manages the “who” can authenticate and from “where” (database, API, who knows)
- The Authenticatable, that manages the “what” to authenticate, like retrieving the password from the correct column or the “remember me” token.
The flow
Once the Request hits the default Authenticate Middleware, it will get the guard or guards you have set using the middleware declaration. Yes, you can set more than one guard, as long they exists or were created using Auth::extend().
Route::get('user/profile', 'UserController@profile')
    ->middleware('auth:passwordless,session,token,anything').
The Authenticate Middleware will take every guard in the order specified and use the check() method of the guard class. This method just calls user() to see if its possible to retrieve the user using the request data. When not, the Authenticate Middleware will throw an AuthenticationException, and redirect the user if the response is not JSON.

Inside each Guard driver, the check() method checks the Request data and tries to get credentials if these are present somewhere (like inside cookie or header). To get the User for these specific credentials, the Guard talks with the UserProvider to retrieve the correct one and validate them.
The UserProvider uses the Model implementing the Authenticatable contract. This ensures the user has an unique identifier, password, and can get or set a remember token. The latter is totally necessary to remember the user and automatically validate him or destroy the token if he logs out.
Using the methods that these Contracts expose makes the implementation of a custom Auth Guard a breeze. For example, you could swap the default EloquentUserProvider, which uses Eloquent, for another one using an HTTP Client to use an external API, or authenticate him with another Database Engine, without touching the authentication procedure. This can be done just changing a line in your config files.
Another example. Change the eloquent driver to another like api driver that will pull out the user from an external API. You could even login a user into your app from another app. BOLLOCKS.
We could even log in a user in our internal network by the IP it belongs, along with its MAC Address — the latter with some console magic. But, yeah, you do can anything without the need of cluttering your application of middlewares and manually calling the Auth Guard.
The Guard contract
To create a Guard, you must implement the Guard or the StatefulGuard. The Guard contract is the basic one, and it was made to for letting the User to authenticate only with its credentials, while the StatefulGuard expands on it with to remember the user using the remember token — thus, remembering the state of the authentication even if the session is no longer valid.
No wonder why the StatefulGuard is implemented by the SessionGuard, which handles the login, session lifetime and cookies to remember the user, meanwhile the TokenGuard uses the Guard contract alone.
What can you do with a custom Guard?
While trying to manage the concepts around the Auth Guard I ended doing my own Passwordless Authentication Guard:
This Guard driver allows the user to authenticated without the need of a password — and you could even register the user without the need of a password.
Its inner working is very simple: Check if the user exists, and if it does, send him a temporary signed link, valid only for 5 minutes, to login. When he hits the login route, the authentication kicks in.
